Vue3.0自定义渲染器
Vue3.0中支持 自定义渲染器 (Renderer):这个 API 可以用来创建自定义的渲染器, (在以往像weex和mpvue,需要通过fork源码的方式进行扩展)
一.自定义渲染器
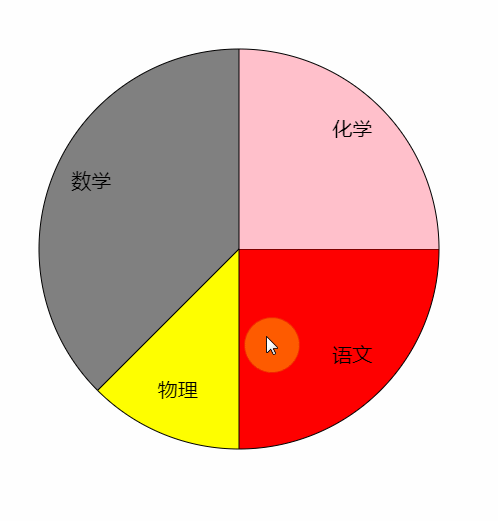
这里我们来自定义一个canvas渲染器,可以渲染常见的饼图
<template>
  <div id="app" @click="handleClick">
    <circle :data="state.data" :x="100" :y="300" :r="200"></circle>
  </div>
</template>
<script>
import {reactive,ref} from 'vue'
export default {
 setup(){
   const state = reactive({
     data:[
       {name:'语文',count:200,color:'red'},
       {name:'物理',count:100,color:'yellow'},
       {name:'数学',count:300,color:'gray'},
       {name:'化学',count:200,color:'pink'},
     ]
   });
   function handleClick(){
     state.data.push( {name:'英语',count:30,color:'green'})
   }
   return {
     state,
     handleClick
   }
 }
}
</script>
1
2
3
4
5
6
7
8
9
10
11
12
13
14
15
16
17
18
19
20
21
22
23
24
25
26
27
2
3
4
5
6
7
8
9
10
11
12
13
14
15
16
17
18
19
20
21
22
23
24
25
26
27
借助Vue响应式的特性,实现图形渲染。
import { createRenderer } from '@vue/runtime-dom';
let renderer = createRenderer(nodeOps);
let ctx;
let canvas;
function createApp(App) {
    const app = renderer.createApp(App);
    return {
        mount(selector) {
            canvas = document.createElement('canvas');
            canvas.width = window.innerWidth;
            canvas.height = window.innerHeight;
            document.querySelector(selector).appendChild(canvas);
            ctx = canvas.getContext('2d');
            app.mount(canvas);
        }
    }
}
createApp(App).mount('#app')
1
2
3
4
5
6
7
8
9
10
11
12
13
14
15
16
17
18
2
3
4
5
6
7
8
9
10
11
12
13
14
15
16
17
18
重写mount方法,生成cavans并进行挂载操作,这里的nodeOps是需要提供的
api,Vue在渲染时会调用用户提供的方法,从而达到自定义渲染器的目的!
二.自定义渲染逻辑
const nodeOps = {
    insert: (child, parent, anchor) => {
        child.parent = parent;
        if (!parent.childs) { // 格式化父子关系
            parent.childs = [child]
        } else {
            parent.childs.push(child);
        }
        if (parent.nodeType == 1) {
            draw(child); // 开始绘图
            if (child.onClick) {
                ctx.canvas.addEventListener('click', () => {
                    child.onClick();
                    setTimeout(() => {
                        draw(child)
                    }, 0);
                }, false)
            }
        }
    },
    remove: child => {},
    createElement: (tag, isSVG, is) => {
        return {tag}
    },
    createText: text => {},
    createComment: text => {},
    setText: (node, text) => {},
    setElementText: (el, text) => {},
    parentNode: node => {},
    nextSibling: node => {},
    querySelector: selector => {},
    setScopeId(el, id) {},
    cloneNode(el) {},
    insertStaticContent(content, parent, anchor, isSVG) {},
    patchProp(el, key, prevValue, nextValue) {
        el[key] = nextValue;
    },
};
1
2
3
4
5
6
7
8
9
10
11
12
13
14
15
16
17
18
19
20
21
22
23
24
25
26
27
28
29
30
31
32
33
34
35
36
37
38
2
3
4
5
6
7
8
9
10
11
12
13
14
15
16
17
18
19
20
21
22
23
24
25
26
27
28
29
30
31
32
33
34
35
36
37
38
这里我们改写
patchProp、insert、createElement方法。
patchProp每次更新属性会调用此方法createElement创建元素会调用此方法insert元素插入到页面中会调用此方法
三.提供draw方法
const draw = (el,noClear) => {
    if (!noClear) {
        ctx.clearRect(0, 0, canvas.width, canvas.height)
    }
    if (el.tag == 'circle') {
        let { data, r, x, y } = el;
        let total = data.reduce((memo, current) => memo + current.count, 0);
        let start = 0,
            end = 0;
        data.forEach(item => {
            end += item.count / total * 360;
            drawCircle(start, end, item.color, x, y, r);
            drawCircleText(item.name, (start + end) / 2, x, y, r);
            start = end;
        });
    }
    el.childs && el.childs.forEach(child => draw(child,true));
}
1
2
3
4
5
6
7
8
9
10
11
12
13
14
15
16
17
18
2
3
4
5
6
7
8
9
10
11
12
13
14
15
16
17
18
针对tag进行渲染操作,并遍历子元素。在子元素渲染的过程中不需要清除画布。
四.饼图绘制
const d2a = (n) => {
    return n * Math.PI / 180;
}
const drawCircle = (start, end, color, cx, cy, r) => {
    let x = cx + Math.cos(d2a(start)) * r;
    let y = cy + Math.sin(d2a(start)) * r;
    ctx.beginPath();
    ctx.moveTo(cx, cy);
    ctx.lineTo(x, y);
    ctx.arc(cx, cy, r, d2a(start), d2a(end), false);
    ctx.fillStyle = color;
    ctx.fill();
    ctx.stroke();
    ctx.closePath();
}
const drawCircleText = (val, posistion, cx, cy, r) => {
    ctx.beginPath();
    let x = cx + Math.cos(d2a(posistion)) * r/1.25 - 20;
    let y = cy + Math.sin(d2a(posistion)) * r/1.25;
    ctx.fillStyle = '#000';
    ctx.font = '20px 微软雅黑';
    ctx.fillText(val,x,y);
    ctx.closePath();
}
1
2
3
4
5
6
7
8
9
10
11
12
13
14
15
16
17
18
19
20
21
22
23
24
2
3
4
5
6
7
8
9
10
11
12
13
14
15
16
17
18
19
20
21
22
23
24
这里就是普通的canvas操作,不进行过多解释啦~
← 架构课活动 Vue3.0异步更新原理 →